

A density meter that is perfectly calibrated can still give you bad data if it is installed wrong. The instrument itself might be fine. The process conditions around it are what determine whether the reading is reliable. And most of the time, when something goes wrong in the field, it is not the instrument that failed. It is the installation.
These five mistakes show up repeatedly across different plants and different industries. All of them are avoidable.
Mistake 1 — Installing Downstream of a Pump or Elbow
This is the most common installation error. Putting the density meter directly after a pump or a sharp elbow puts the fork in the middle of turbulent flow. The vibration signal picks up that turbulence as noise, and the reading bounces around even when the actual density is completely stable.
The fix is straightforward: keep at least 10 to 15 pipe diameters of straight run upstream of the instrument. If that is not possible, put it at least 3 diameters downstream of any disturbance. The straight run gives the flow time to settle and become fully developed before it reaches the fork.
Mistake 2 — Running the Fork Dry
Tuning fork density meters rely on the fork being immersed in liquid to keep the piezoelectric driver within its design parameters. Running the instrument dry, even for a few seconds during startup or shutdown, can damage the piezoelectric element.
In practice this means making sure the process connection is in a location where the fork stays submerged during normal operation, including low-level conditions. If there is any chance the liquid level can drop below the fork, install a siphon loop or a different mounting location.
Mistake 3 — Ignoring Temperature at the Installation Point
Density is temperature-dependent. A liquid that reads 0.850 g/cm³ at 20°C might read 0.840 at 30°C even if nothing else changed. Most modern instruments have built-in temperature compensation, but the compensation is only as good as the temperature sensor placement.
If the temperature sensor is at the transmitter and the process connection is 3 meters away, the temperature at the fork could be significantly different from what the instrument thinks it is. Make sure the temperature measurement is at the sensing point, not somewhere convenient for wiring.
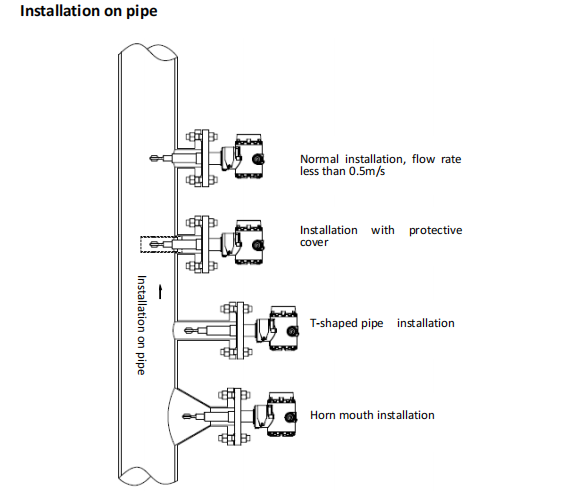
Mistake 4 — Wrong Orientation for the Process Connection
Some tuning fork density meters are designed for vertical insertion only. Others can be mounted at an angle. Using the wrong orientation changes the immersion depth and can expose one prong to more flow than the other, creating an asymmetric signal.
Check the manufacturer is documentation before installing. If the spec sheet says vertical insertion only, that is not a suggestion. It is a requirement for accurate measurement.
Mistake 5 — Skipping the Pre-Commissioning Check
After the instrument is piped and wired but before the process starts, do a basic check. Verify the 4-20mA signal reads correctly at the DCS end. Check that the RS485 wiring is correct if you are using Modbus. Confirm that the display shows a plausible density value even if it is not the correct process liquid yet.
Catching a wiring error or a bad signal after the process is running means a shutdown. Catching it during pre-commissioning means a five-minute check. The time difference is not worth skipping.
A Quick Installation Checklist
Before commissioning a new density meter installation, run through this list:
|
# |
Check |
What to Verify |
|
1 |
Straight run upstream |
≥10 pipe diameters before meter |
|
2 |
Fork fully submerged |
At min liquid level and normal flow |
|
3 |
Temperature sensor location |
At fork, not at transmitter |
|
4 |
Orientation matches spec |
Vertical or angled per datasheet |
|
5 |
Signal output verified |
4-20mA read at DCS, Modbus wiring checked |
LONNMETER Installation Support
LONNMETER provides installation documentation with every LONN700 density meter, including recommended pipe locations, minimum straight run requirements, and wiring details for both 4-20mA and RS485 output.
If you are planning a new installation or troubleshooting an existing one, the LONNMETER technical team can review the piping layout and confirm the best installation location before you commit to a specific position.
Post time: Jun-10-2026


